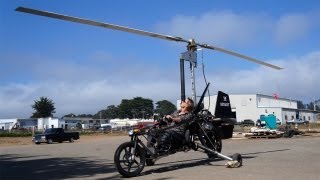
Автожир своими руками. Процесс постройки автожира Gyrobee.
------------
Gyrobee gyroplane, step by step
------------
Многочисленные вопросы по поводу где купить, сколько стоит и как долго строить:
Я покупал базовый набор на сайте starbeegyros.com в 2012 году. Деревянный ящик набора виден на первых кадрах. Из готовых частей в наборе была только складная мачта. Все остальные детали изготавливались из материалов, которые по обрезались по размеру, сверлились, обрабатывались и прочее.
На тот момент я бы мог купить готовый набор (без ротора, двигателя, приборов), но намного дороже. Я решил, что буду делать сам, поэтому приобрел базовый набор, и все остальные части покупал по мере готовности моего проекта.
Пошаговый процесс создания я постарался запечатлеть на фото, которые делал на каждом этапе. После чего сделал из них это видео.
Весь процесс постройки я подробно описывал в моем блоге: rotorpt.blogspot.com
Чертежи я скачал бесплатно в интернете, ключевые слова Gyrobee by Ralph Taggart.
Огромное спасибо Александру Ламеко (ABM) за перевод чертежей на русский язык, и последующие консультации по постройке.
-------------------
Numerous questions about where to buy, how much it costs and how long to build:
I bought a basic kit (0.17 in this video) from starbeegyros.com in 2012. The wooden set box is visible in the first shots. Of the finished parts, there was only a folding mast in the kit. All other parts were made from materials that were cut to size, drilled, processed and so on. The rest was acquired as needed.
All aluminum pipes is 6061-t6, steel parts is 4130, bolts AN.
I can´t say how much because I built patiently (about 3 years). I bought many parts in England, France, Germany, USA, Russia, Spain. Turning and milling work are expensive and difficult to find, who could do it..
The final cost largely depends on the availability of turning and milling machines and free time.
At that time, I could buy a ready-made set (without a rotor, engine, instruments), but much more expensive. I decided that I would do it myself, so I bought a basic set, and bought all the other parts as soon as my project was ready.
I tried to capture the step-by-step process of creation in the photos that I took at each stage. Then I made this video out of them.
I described the whole construction process in detail in my blog: rotorpt.blogspot.com (in russian)
I downloaded the drawings for free on the Internet, the keywords are Gyrobee by Ralph Taggart.
Many thanks to Alexander Lameko (aka. ABM) for the translation of the drawings into Russian, and subsequent consultations on the construction.


Информация по комментариям в разработке